最近参与CIS大会,看到一款自动化渗透工具 Ary,特点是汇聚了各种可以调用的工具。
介绍
工具地址 https://github.com/TeraSecTeam/ary
POC收集 https://github.com/TeraSecTeam/poc-collection
Ary是一个集各种渗透工具于一体的工具,不过看起来还是一个开发中的版本,试用了一遍,感觉还不错。注意需要使用centos,好像ubuntu会报一些错误。
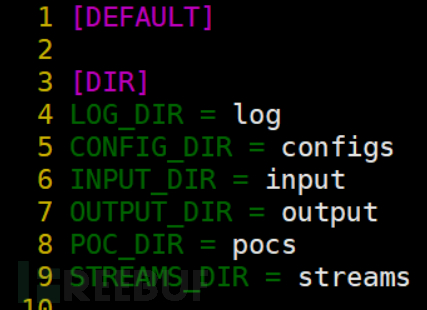
文件结构介绍
├── ary #二进制文件
├── configs #配置文件夹
├── input
├── log #日志记录
├── output #输出目录
├── pocs #poc文件夹,可以用自己的POC或者网上的poc
├── README.md 使用说明
└── streams #执行流所在文件夹,自己定义组合
核心功能介绍
信息收集
-
空间搜索引擎收集
-
爬虫类工具收集
-
爬虫类+存储类收集
工具联动
-
爬虫类+扫描类工具(Poc验证)
-
存储类+扫描类(Poc验证)
-
工具联动自定义+自动化
安装
1.安装所有的工具引擎,执行命令后,将会自动下载第三方的渗透工具,如xray。也可以预先不下载,在执行命令的时候如果缺少某个第三方工具会自动下载。
./ary --vulnscan --engine all --update -v
./ary --assertscan --engine all --update -v
2.chrome 的安装(爬虫需要)
配置yum谷歌的源:
vi /etc/yum.repos.d/google.repo
将下面这段粘贴进文件
[google]
name=Google-x86_64
baseurl=http://dl.google.com/linux/rpm/stable/x86_64
enabled=1
gpgcheck=0
gpgkey=https://dl-ssl.google.com/linux/linux_signing_key.pub
配置完之后,执行以下bash命令,安装google-chrome
yum update
yum install google-chrome-stable
google-chrome --version
配置文件
默认加载配置为带有settings.ini的文件configs/example.settings.ini文件为配置示例,可以修改其内容,如加入网络搜索引擎的token
1.目录设置
可以设置各输入和输出目录
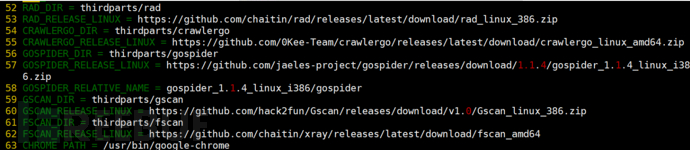
2.第三方工具来源
xray下载地址及下载输出位置

3.信息收集来源
包含rad,crawlergo,gospider等信息收集工具
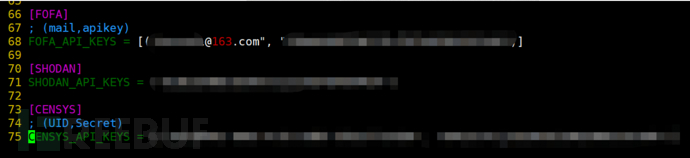
4.空间搜索引擎配置
主要是配置fofa,shodan,censys的token或API key
使用体验
1.网络空间搜索
支持shodan、fofa、censys等空间搜索引擎,使用相关搜索需要在配置文件configs/example.settings.ini中配置相应的token。
相关命令
./ary --netsearch --engine shodan --keyword dedecms -v --limit 10
./ary --netsearch --engine shodan --keyword "tomcat country:"US"" -v --limit 10
./ary --netsearch --engine fofa --keyword redis -v --limit 10
./ary --netsearch --engine fofa --keyword "protocol=socks4 && banner="0x5a"" -v --limit 10
./ary --netsearch --engine censys --keyword redis -v --limit 1000
如使用shodan进行搜索
配置token(需要自己注册shodan的账号,获取token)
cd configs[root@centos configs]# vim example.settings.ini

搜索dedecms框架, 限制10条
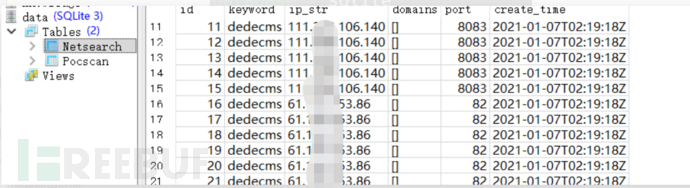
[root@centos kk]# ./ary --netsearch --engine shodan --keyword dedecms -v --limit 10
结果如下

搜索结果默认保存在sqlite中,在配置文件中配置,公开版默认配置sqlite
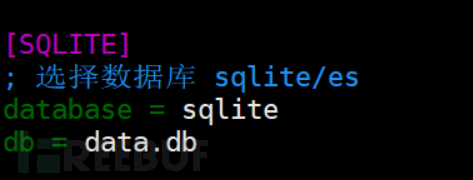

使用sqlite3工具 SQLiteStudio查看,可看到结果已保存到本地data.db中
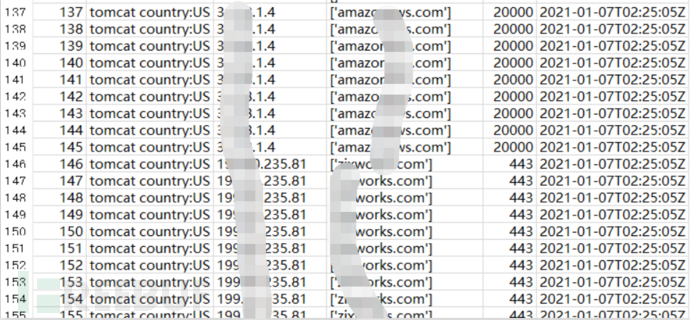
采用shodan语法搜索, 搜索国家为美国的tomcat
[root@centos kk]# ./ary --netsearch --engine shodan --keyword "tomcat country:"US"" -v --limit 10
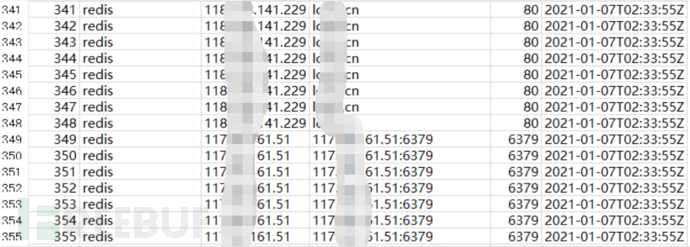
使用fofa基本语法搜索
[root@centos kk]# ./ary --netsearch --engine fofa --keyword redis -v --limit 10
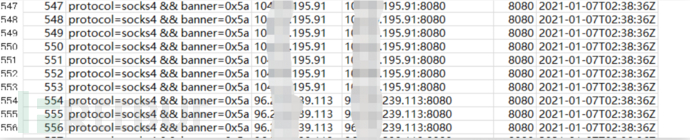
根据特征搜索sock4代理,关键词为
protocol=socks4 && banner="0x5a"
./ary --netsearch --engine fofa --keyword "protocol=socks4 && banner="0x5a"" -v --limit 10
结果
评论
censys的结果不精确,没有相应的端口
推荐shodan和fofa
2.资产扫描
基于在线靶场测试http://testhtml5.vulnweb.com
基于ARL资产扫描
ARL是freebuf能力中心开源的一套资产扫描系统(https://github.com/TophantTechnology/ARL),提供docker版,有前端界面,基于ARL可以方便进行资产扫描和可视化
这里采用ARL 资产侦查灯塔系统(https://hub.docker.com/r/tophant/arl/tags?page=1&ordering=last_updated)
直接使用docker版本的ARL,登录进去后改密码
在配置文件里配置ARL
ARL token在登录后可以从cookie获取
打开F12查看cookie
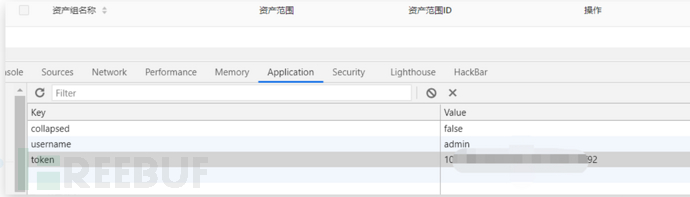
PS: 在启动docker的时候可以配置固定token,如果需要一直使用建议进行配置
之后在配置文件的[assertscan]中进行相应配置

通过ary调用ARL进行资产扫描
ARL:
./ary --assertscan --engine arl --input指定文件
./ary --assertscan --engine arl --url指定url,可指定多个url,url之间用逗号隔开
资产扫描相关命令
# 启动一个任务
# 查找子域名
./ary --assertscan --engine arl --url www.aaa.com -v --condition subdomain
./ary --assertscan --engine arl --url www.aaa.com,www.bbb.com -v --condition subdomain
# 查找子域名 指定文件
./ary --assertscan --engine arl --input targets.txt -v --condition subdomain
# 查找子域名 指定输出文件名
./ary --assertscan --engine arl --url www.aaa.com -v --condition subdomain --output arl.csv
# 查找端口
./ary --assertscan --engine arl --input targets.txt -v --condition portscan
# 获取任务结果
./ary --assertscan --engine arl -v --fetch-result --keyword 5fd321f0a4a557000fb2a574
# 获取任务结果 - 加载文件
./ary --assertscan --engine arl -v --fetch-result --input arl.csv
扫描测试
./ary --assertscan --engine arl --url http://testhtml5.vulnweb.com -v --condition subdomain
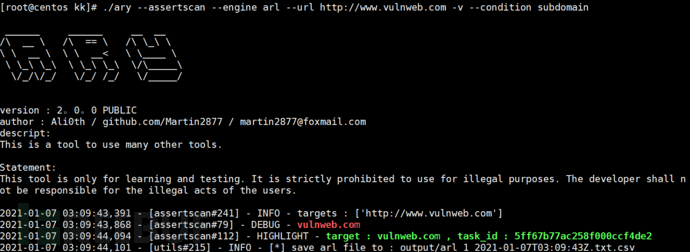
登录ARL后台,x.x.x.x:5003, 输入账号密码,可以看到在ARL中已经启动了任务

获取扫描完毕的结果
[root@centos kk]# ./ary --assertscan --engine arl -v --fetch-result --keyword 5ff67b77ac258f000ccf4de2
或者直接把文件作为输入
[root@centos kk]# ./ary --assertscan --engine arl -v --fetch-result --input output/arl_1_2021-01-07T03\:09\:43Z.txt.csv

端口扫描
./ary --assertscan --engine arl --input vulnweb.com -v --condition portscan
端口扫描仅限于top100,不太好用,不能指定端口
3.爬虫类
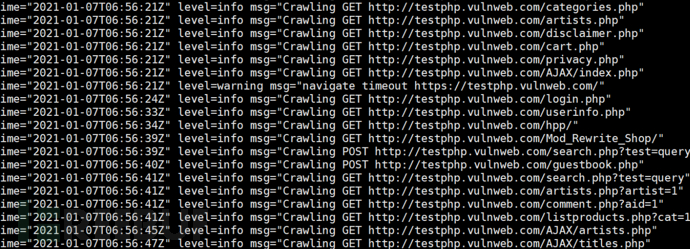
./ary --assertscan --engine rad --url http://testphp.vulnweb.com/ -v
./ary --assertscan --engine gospider --url http://testphp.vulnweb.com/ -v
./ary --assertscan --engine crawlergo --url http://testphp.vulnweb.com/ -v
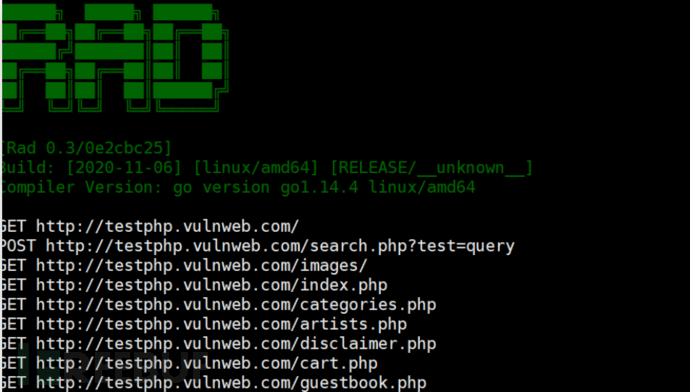
使用rad进行爬取
[root@centos kk]# ./ary --assertscan --engine rad --url http://testphp.vulnweb.com/ -v
如果没有rad,会自动下载并开始爬取
rad配置文件rad_config.yml在当前目录生成爬取过程
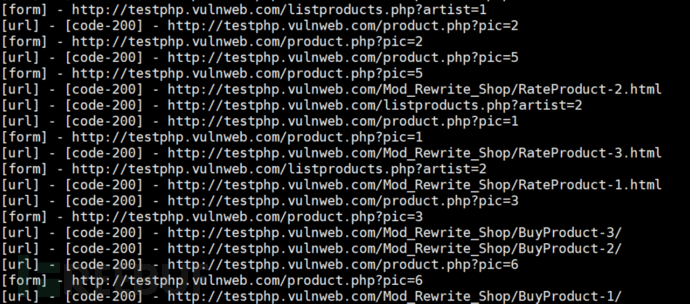
保存结果在
output/rad_1_2021-01-07T06:47:23Z.txt
使用gospider进行爬取
./ary --assertscan --engine gospider --url http://testphp.vulnweb.com/ -v
如果没有gospider,会自动下载并开始爬取
结果保存在output/gospider文件夹下
2021-01-07 06:50:00,846 - [assertscan#143] - HIGHLIGHT - saved to output/gospider
gospider比rad在参数上更加详细
使用crawlgo进行爬取
如果没有crawlgo,会自动下载并开始爬取
[root@centos kk]# ./ary --assertscan --engine crawlergo --url http://testphp.vulnweb.com/ -vCrawlgo的也比较详细,但是速度较gospider和rad慢
结果保存在output文件夹下
2021-01-07 06:57:40,600 - [assertscan#165] - HIGHLIGHT - saved to output/crawlergo_1_2021-01-07T06:56:05Z.txt
4.漏洞扫描
# 对目标进行扫描
./ary --vulnscan --url http://testphp.vulnweb.com/ --engine xray -v
# 对目标进行被动扫描(rad+xray)
./ary --vulnscan --engine xray --url http://testphp.vulnweb.com/ -v --passive
# 对文件中的目标进行被动扫描
./ary --vulnscan --engine xray --input target.txt -v --passive
# 读取数据库中的数据进扫描
./ary --vulnscan --engine xray --keyword tomcat -v
./ary --vulnscan --engine xray --keyword tomcat -v --crawl
直接调用xray进行扫描
./ary --vulnscan --url http://testphp.vulnweb.com/ --engine xray -v
如果没有xray,会自动下载并开始爬取
xray的配置文件config.yaml默认在当前文件夹生成

下载完后保存在在thirdpartys文件夹下

xray结果以json格式保存在output目录下
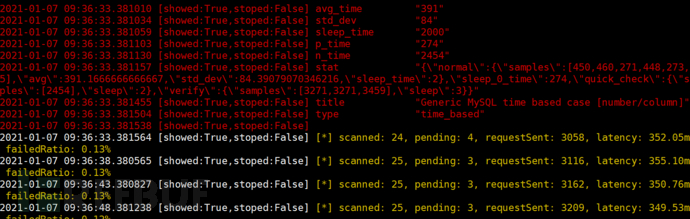
调用xray进行被动扫描
./ary --vulnscan --engine xray --url http://testphp.vulnweb.com/ -v --passive
效果不好,可能是使用姿势不对,待进一步探索
xray+gospider分开跑
效果不错
在两个终端中运行程序:
运行xray, xray在7778端口监听,被动扫描模式
./ary --vulnscan --engine xray --port 7778 --background -v
运行gospider,将流量转发到7778端口给xray进行扫描,使用xray对go spider的内容进行扫描
./ary --assertscan --engine gospider --url http://testphp.vulnweb.com/ -v --passive --port 7778
效果如下
xray+rad分开跑
运行rad,将流量转发到7778给xray扫描,效果不错
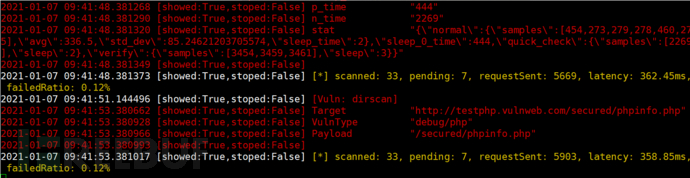
xray+crawelgo分开跑
运行crawelgo,扫描的数量多一点,但是相对来说慢一点

5.POC使用
PoC 漏洞验证
POC可自行在POC收集 https://github.com/TeraSecTeam/poc-collection项目中寻找
./ary --pocscan --input redis.txt --poc redis -v
./ary --pocscan --url xx.xx.xx.xx --poc ./pocs/redis -v
./ary --pocscan --poc tomcat --keyword tomcat -v
./ary --pocscan --keyword redis --poc redis -v
./ary --pocscan --keyword redis --poc redis -v --limit 1 --dumppcap redis
./ary --pocscan --keyword thinkphp --poc thinkphp_rce2 -v --limit 20 --dumppcap thinkphp
# 写到数据库
./ary --pocscan --url xx.xx.xx.xx --poc redis -v --limit 2 --upload
redis POC 效果

针对单个网站打poc
[root@centos kk]# ./ary --pocscan --url 122.xx.xx.xx --poc redis -v
针对数据库中的关键词打POC
[root@centos kk]# ./ary --pocscan --keyword redis --poc redis -v
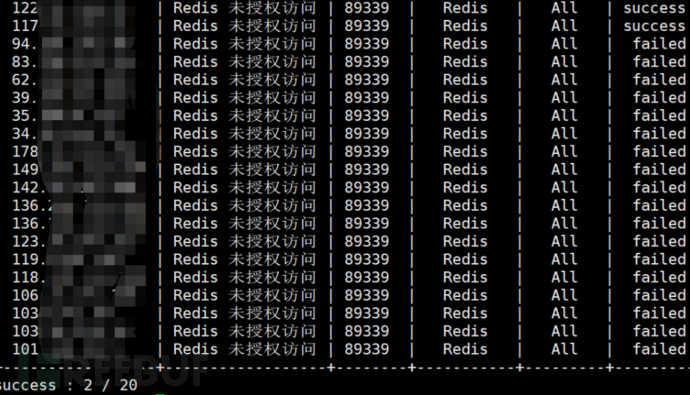
对数据包详细分析
执行流尝试使用录包功能,录包之后为pcap格式,可以用wireshark打开

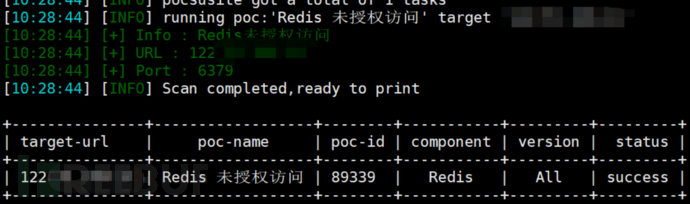
6.Stream模块使用
使用这个模块可以自定义过程。
使用steam进行POC验证
自定义过程的配置在./streams/streams.yaml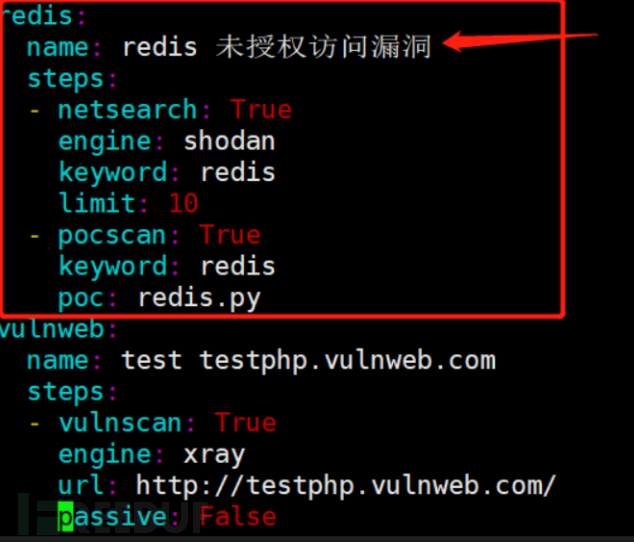
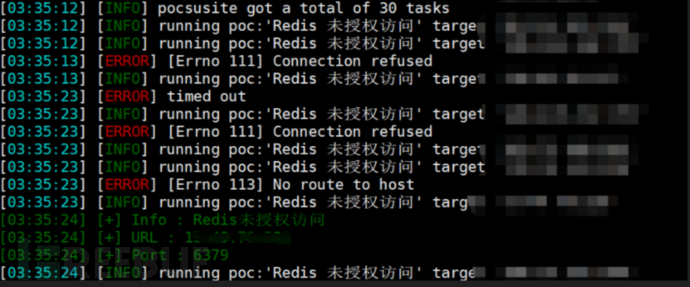
./ary -v --stream --input streams.yaml --keyword "redis 未授权访问漏洞"
可以看到名称为redis 未授权访问漏洞,故在命令行中输入该关键词`--keyword "redis 未授权访问漏洞"`
将会使用shodan进行redis搜集,并且使用pocs目录下的redis.py POC进行利用尝试
效果如下
使用stream进行漏洞挖掘
也可以进行漏洞扫描,指定xray引擎,非passive方式扫描,关键词为test testphp.vulnweb.com
./ary -v --stream --input streams.yaml --keyword "test testphp.vulnweb.com"
即可进行xray扫描
效果 如下

Trouble shooting
1、API报错
2021-01-07 02:28:23,382 - [netsearch#217] - DEBUG - fofa mail : [email protected], secret : 238ebxxxxxxxxxxxxxxxxxx2440
2021-01-07 02:28:23,387 - [database#28] - DEBUG - using database : sqlite
2021-01-07 02:28:23,396 - [netsearch#249] - DEBUG - https://fofa.so/api/v1/search/[email protected]&key=238ebxxxxxxxxxxxxxxxxxx2440&qbase64=aXA9IjguOC144Ljgi&size=1
2021-01-07 02:28:24,597 - [netsearch#253] - ERROR - 401 Unauthorized, make sure 1.email and apikey is correct 2.FOFA coin is enough.
解决方法: 注册账号,获取token,并在配置文件中填入相应的token
2、端口被占用

解决方法
[root@centos kk]# ./ary --kill --engine xray --port 7777 -v
总结
- 快速的资产收集和工具联动操作
- 在获取某个POC和框架信息的情况下,可以快速聚合所需要的网站并且调用需要的工具进行扫描
- 适用于平时进行漏洞挖掘
- 数据库的使用可以发挥更多的想象力,其他版本在数据方面应该会更友好
- 体验下来,公开版适用于渗透测试前中期的自动化工作,辅助在测试中更快地寻找到突破点


 认证信息
认证信息